Photoshop Teeth Whitening Secrets Revealed
In the realm of digital image editing, Photoshop reigns supreme, offering an array of tools and techniques to enhance and perfect every aspect of a photograph. One of the most sought-after skills is teeth whitening, transforming smiles with a few simple steps. This comprehensive guide will unveil the secrets to achieving professional-looking teeth whitening in Photoshop, ensuring your subjects’ smiles shine brighter than ever before. Prepare to learn advanced techniques, avoid common pitfalls, and master the art of subtle, natural-looking enhancements. By understanding these techniques, you’ll gain the power to create stunning before-and-after transformations that leave a lasting impression. Let’s dive in and discover the hidden potential within Photoshop’s teeth whitening capabilities!
Understanding the Basics of Teeth Whitening in Photoshop
Before diving into specific techniques, it’s crucial to grasp the fundamentals. Effective teeth whitening goes beyond simply brightening the color; it requires a nuanced approach that considers the overall image and the specific characteristics of the teeth. Photoshop offers a wide array of tools, each with its unique capabilities, and understanding how to leverage these tools is the first step to success. Remember that the goal is not to create a fake, overly bright smile, but to enhance the natural beauty of the teeth. Proper selection, precise adjustments, and attention to detail are the keys to achieving professional-quality results. Moreover, taking the time to understand the principles of color and light can significantly improve your teeth whitening skills. The following sections will provide a deeper dive into the technical aspects, making it easier to achieve a flawless finish.
Why Photoshop is a Powerful Tool

Photoshop is not just a photo editor; it’s a digital art studio. Its extensive toolset and layers-based workflow offer unparalleled flexibility and control, making it the ideal platform for teeth whitening. Unlike automated or simplified solutions, Photoshop allows for precise adjustments and corrections, ensuring that the final result looks both natural and professional. The non-destructive editing capabilities, using layers and masks, mean you can experiment freely without altering the original image. This gives you the freedom to refine your work until it perfectly matches your vision. Photoshop also supports advanced techniques like frequency separation and dodging/burning, which can address complex issues such as uneven staining and highlights/shadows. From basic brightness adjustments to complex color manipulations, Photoshop empowers you to take complete control over the entire image.
Color Theory and Teeth Whitening
Understanding color theory is essential for successful teeth whitening. The color of teeth is influenced by factors like genetics, diet, and staining. Recognizing the subtle interplay of hues and tones within the teeth is the key to achieving a natural look. Pay attention to the yellows, oranges, and sometimes even blues that make up the tooth color. Adjusting these colors without over-saturating them is critical. Using tools like the Hue/Saturation and Color Balance adjustments, you can target and correct the specific color casts in the teeth. A good understanding of color theory helps you to avoid a monochromatic, artificial look. Remember, your goal is to restore the natural brightness and vibrancy of the teeth, not to create a completely unnatural white. Careful application of these principles will transform your editing skills, making the process much more effective.
Common Mistakes to Avoid
Several common mistakes can ruin an otherwise good teeth whitening job. One of the most frequent is over-whitening, which leads to a stark, unnatural appearance. Another mistake is failing to address the surrounding areas; the teeth whitening should always be consistent with the overall lighting and color balance of the image. Also, be careful when applying whitening effects unevenly. Overlooking the subtle variations in color and tone across the teeth will produce a clumsy look. Avoid using extreme settings, which can result in banding or other artifacts. Finally, neglecting to refine your selection around the teeth will cause visible halos or a ‘cut-out’ effect. By carefully addressing these common issues and taking your time, you can avoid these pitfalls and achieve stunning results every time. Practicing will develop your eye and refine your technique.
The Quick Selection Tool for Teeth Whitening

The Quick Selection Tool is a valuable asset in Photoshop for making fast and precise selections, including the teeth. This tool intelligently detects edges and allows you to quickly isolate specific areas of an image. Proper use of the Quick Selection Tool, along with refinements, ensures that your adjustments only affect the teeth, providing a clean and professional outcome. Mastering this tool will significantly streamline your workflow and allow for more precision. Let’s break down the process step-by-step, and you’ll find how simple and useful it can be. Remember that even a basic understanding of the tool’s properties will greatly enhance your effectiveness and overall control.
Selecting the Teeth
Begin by selecting the Quick Selection Tool from the toolbar. Then, adjust the brush size to suit the area you are working on. Start by clicking and dragging the tool over the teeth. Photoshop will automatically detect the edges and create a selection. For larger areas, the selection process is simple and quick. For smaller and more complex areas, you may need to adjust the brush size and add or subtract from the selection. Zoom in to get a better view of the details. With a steady hand and patience, you will be able to precisely select the teeth. Make sure to include the entire surface of each tooth, from the edges to the gum line.
Refining the Selection
Once you have made the initial selection, it is important to refine it. There are often imperfections in the initial selection, and these can be corrected using the tools available. Use the “Add to Selection” or “Subtract from Selection” options to accurately include or exclude specific parts of the image. The Quick Selection Tool will often include or miss small parts of the teeth or surrounding areas. By zooming in and carefully adjusting the selection, you can eliminate any unwanted parts. Ensure that the edges of your selection are clean and precise. Fine-tuning your selection now will save you time and give a better result later. Always take the time to meticulously refine your selection for a polished final image.
Adjusting Brightness and Contrast

Once the teeth are selected, the next step is to adjust their brightness and contrast. This is a crucial step that directly impacts the overall look of the whitening effect. Photoshop offers several tools for this, including the Brightness/Contrast adjustment and the Curves adjustment, each providing different levels of control and flexibility. Proper use of these tools will allow you to subtly enhance the natural brightness of the teeth without making them appear artificial. By strategically increasing the brightness and adjusting the contrast, you can bring out the natural highlights and shadows of the teeth, giving them a healthy and radiant appearance. Fine-tuning these settings is key to achieving professional-looking results.
The Power of the Curves Adjustment
The Curves adjustment tool offers unparalleled control over the brightness and contrast of the selected teeth. Unlike the simple Brightness/Contrast tool, Curves allows you to manipulate the tonal range of the image with precision. By adjusting the curve, you can brighten the highlights, darken the shadows, or subtly alter the mid-tones. For teeth whitening, the Curves tool allows you to selectively brighten the teeth while preserving their natural shadows. A gentle S-curve can add brightness and contrast. This technique is key to avoiding a flat, over-whitened look. Remember that subtlety is the key, so use the Curves adjustment carefully and gradually, making small adjustments until you achieve the desired result. Experiment with different curves and pay attention to how they affect the overall appearance of the teeth.
Subtle vs. Dramatic Changes
The approach to teeth whitening should always be guided by the specific requirements of the image. In some cases, only a subtle enhancement is needed to remove slight discoloration, while in others, a more dramatic change may be necessary. The key is to ensure that any changes you make appear natural. Start with subtle adjustments, gradually increasing the brightness and contrast until you achieve the desired effect. Avoid making extreme changes that could lead to an unnatural appearance. If you are aiming for a subtle enhancement, use the Brightness/Contrast or Curves tools to make minor adjustments. For a more dramatic transformation, you might need to combine several techniques. Always view your changes within the context of the overall image and consider the lighting, skin tone, and other elements.
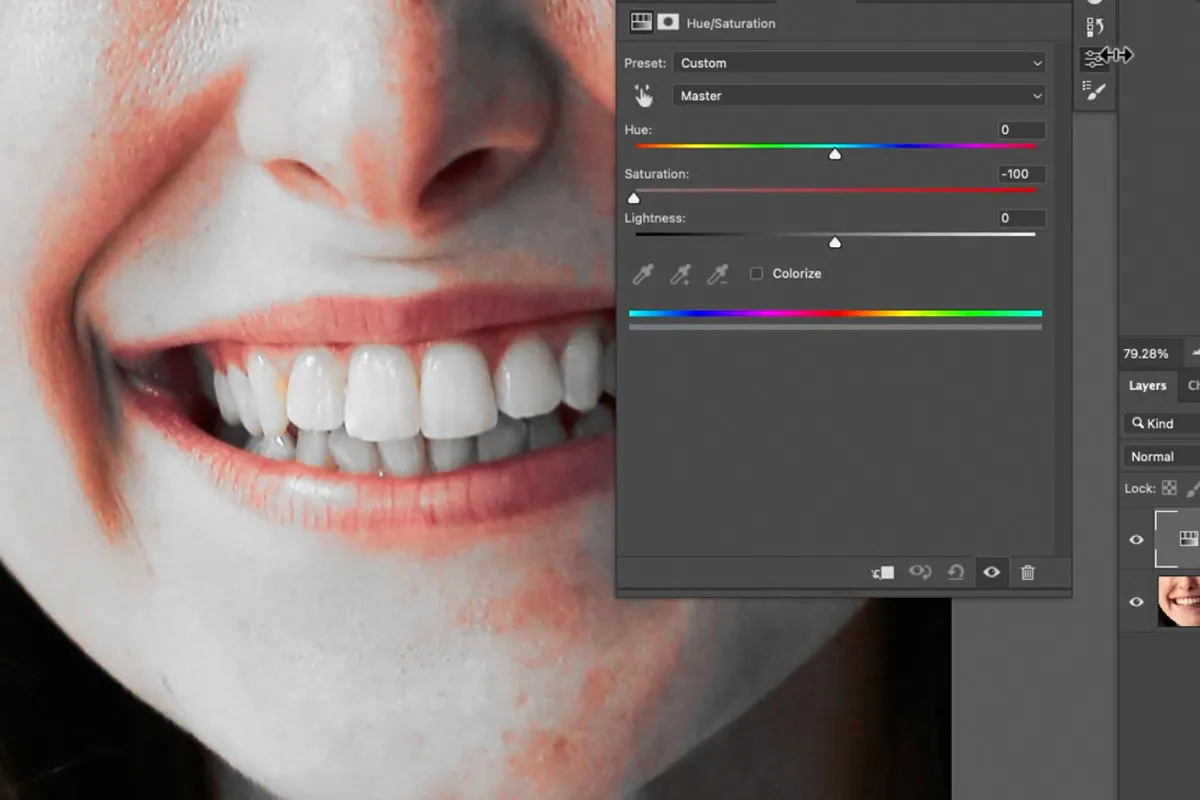
Using the Hue/Saturation Adjustment

The Hue/Saturation adjustment tool allows for targeted color adjustments, which is especially valuable in teeth whitening. Teeth often have yellow or orange tones that detract from their brightness. Using Hue/Saturation, you can selectively reduce these color casts, bringing the teeth closer to a natural white. This tool provides control over the hue (the color itself), the saturation (the intensity of the color), and the lightness (brightness). By adjusting the yellow and orange hues, you can diminish their presence. This will make the teeth appear brighter and cleaner. Careful use of this tool ensures that the whitening effect looks consistent across all teeth. It can be very effective in removing the yellowness and improving the color.
Fine-tuning Color and Tone
Fine-tuning the color and tone is crucial for achieving a realistic and natural-looking result. After using the Hue/Saturation adjustment, you might need to make further adjustments to refine the color of the teeth. Start by slightly reducing the saturation of the yellow and orange hues. This will help to remove the staining and bring the teeth closer to a neutral color. Then, carefully adjust the hue slider to fine-tune the color. Be careful to avoid making the teeth appear too blue or gray. Observe the result within the overall image and compare it to the surrounding skin tones. This step involves a series of subtle adjustments to eliminate any artificial colors. Taking your time and making small, incremental changes will help you to achieve the best outcome. You may also use the Color Balance adjustment for final fine-tuning.
Avoiding the Artificial Look
The key to successful teeth whitening in Photoshop is avoiding an artificial look. The goal is to enhance the natural brightness of the teeth. Make sure that your adjustments blend seamlessly with the rest of the image. One of the most common telltale signs of over-whitening is a flat, monochromatic appearance. Avoid this by preserving the natural shadows and highlights of the teeth. Keep the overall lighting of the teeth consistent with the rest of the image. Compare your results with the original image regularly. If the teeth appear too bright or unnatural, you should reduce the intensity of your adjustments. Also, remember that the teeth should never be whiter than the whites of the eyes. Applying these principles will help you achieve results that look both natural and professional.
Advanced Techniques for Professional Results

For a truly professional-looking finish, you can incorporate advanced techniques, such as the Dodge and Burn tools and Frequency Separation. These techniques offer refined control and can address complex issues, such as uneven staining and highlights. Using these advanced methods can help you achieve a more natural and polished outcome, particularly in challenging images. These methods require practice and a good understanding of the underlying principles of image editing. Mastering these techniques will place you a cut above other image editors. These methods offer increased control and can resolve subtle imperfections that basic techniques might overlook. While they require more expertise, the results are worth the effort.
Using the Dodge and Burn Tools
The Dodge and Burn tools offer detailed control over the light and shadows. These tools can be used to subtly enhance the highlights and shadows of the teeth, which is essential for giving the image a natural appearance. The Dodge tool brightens areas, while the Burn tool darkens them. Use the Dodge tool to brighten any dull spots and the Burn tool to darken areas where needed. These tools can be used to reshape and refine the look of the teeth. Start with a low brush opacity and gradually build up the effect. Apply these tools with care and with a light touch. Doing so will help to maintain a natural and realistic look. These techniques add a subtle three-dimensional effect to your image.
Applying Texture and Detail
When whitening teeth, it’s important to preserve the natural texture and detail. Overly aggressive adjustments can result in a flat, unrealistic look. The Dodge and Burn tools are excellent for enhancing these details. By carefully applying these tools to the selected area, you can accentuate the natural highlights and shadows. To do this effectively, use a very soft brush and a low opacity setting. Work gradually, and pay close attention to the details. Using this technique will help ensure that the texture and details are preserved. Another technique to consider is applying a small amount of sharpening to the teeth. This can help enhance the details and give the teeth a more polished look. When applied correctly, these techniques contribute to a refined and professional outcome.
Frequency Separation for Flawless Whitening

Frequency separation is a powerful technique that separates the image into two layers: one containing the texture and details, and the other containing the color and tone. This allows you to make targeted adjustments without affecting the underlying structure of the image. By using frequency separation, you can whiten the teeth without losing any of the natural textures and details. This can be especially useful if there are stains or imperfections that need to be removed. Understanding the principles of frequency separation can greatly improve the quality of your whitening jobs. You will also find that it is not just good for teeth whitening, it is useful for other facial features as well.
Removing Stains and Discoloration
Frequency separation is particularly effective at removing stains and discoloration. After separating the image, you can target the color layer to remove any undesirable hues. By targeting specific colors or tones, you can eliminate stains without affecting the texture of the teeth. When working with the color layer, use the Healing Brush or Clone Stamp tools to remove small imperfections. The result is cleaner and brighter teeth without losing the natural details. This method can be particularly useful for dealing with uneven staining or discoloration. This technique allows you to remove imperfections while preserving the natural look. It’s important to zoom in and work carefully, to ensure that your changes look seamless.
Tips for Working with Different Teeth
Different teeth will have different challenges. When whitening teeth, you may encounter a wide variety of issues, ranging from minor stains to significant discoloration. Different types of teeth may respond differently to your corrections. You must tailor your approach to meet the individual needs of each image. Always analyze the specific challenges and adapt your techniques accordingly. Some teeth may require more subtle adjustments, while others may benefit from more intensive work. Always be mindful of the natural variations in color and tone. Remember to work carefully to ensure that the final result looks natural and balanced. Mastering these strategies will enhance your image editing abilities and enable you to address complex issues with confidence.
Finalizing and Optimizing Your Image

After completing the teeth whitening process, the image needs to be finalized and optimized. This step involves checking the consistency of the adjustments and exporting the image for its intended use. Take a final look at the entire image and make sure that the changes are consistent. Review the color balance, and make any last-minute adjustments. Make sure your final result looks both natural and professional. Proper optimization ensures that the final image looks its best, whether it’s for print or online use. A well-optimized image will make a lasting impression. Don’t skip this important step.
Checking for Consistency
After making the adjustments, carefully check your image for consistency. Zoom out to view the entire image and ensure that the teeth whitening appears natural. Pay close attention to the color balance and make sure the teeth match the surrounding skin tones. Ensure the whitening is consistent across all teeth and that there are no visible artifacts or halos. If you see any inconsistencies, go back and make further adjustments. Carefully assess the details and color. Make a final review to ensure that the results meet your expectations. Always take the time to check your final product for consistency to ensure that you have achieved a professional-looking result. It’s essential to review every aspect of the image before exporting it.
Exporting Your Image
The final step is to export your image. Save your image in a format suitable for its intended use. For web use, JPEG is often the best choice, as it provides a good balance between quality and file size. For print, TIFF is a good option, as it is lossless. Before exporting, check the color profile of your image. Make sure that it matches the color profile of your printer or the intended display. Use the “Save As” or “Export” options in Photoshop to save your image. When saving for web use, adjust the quality settings to balance the file size with image quality. Optimizing your image for the specific format will allow it to look its best. By carefully selecting the proper format and optimizing the settings, you will ensure that your image maintains its quality.